Nodes
Nodes build up the flow of a game. The first time a user interacts with the game it will begin at the start-node and then go through as many linked nodes as necessary. When the game reaches a hear node the execution will stop and the player is presented with a choice.
On the next interaction the game will continue from the last node.
Node features
A node in Fabella normally has one entry and one or more exits.
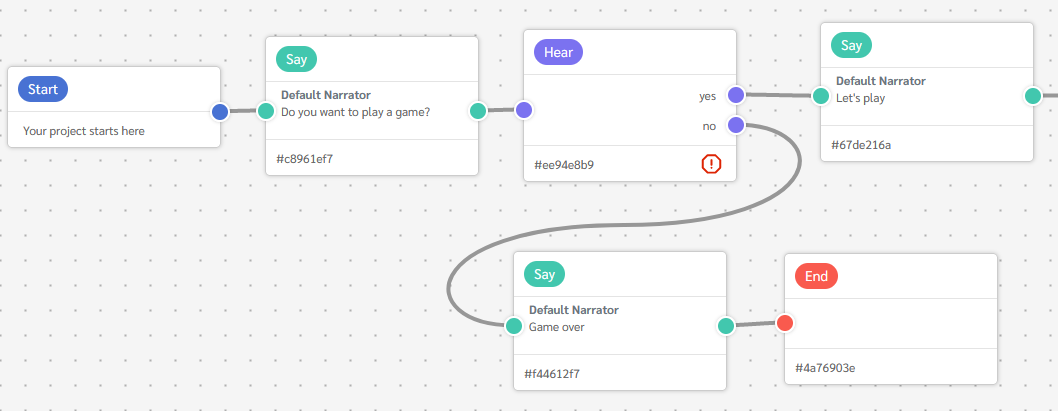
In the image below we have the following nodes:
- Start - the game starts here and there is a single entry.
- Say - this makes the game play audio, but it will not affect the game process. One entry and one exit.
- Hear - the first time this node is processed execution will stop. Depending on the user input, yes or no, the game will branch to one of the two exits.
- End - the game will end here and on the next interaction the player will begin from the start-node. It has a single entry.
Working with nodes
Creating nodes
There are a couple of different ways of adding new nodes to your project:
- Click on button Insert node in the header bar.
- Right click in the workspace and go to Insert node to open menu with available nodes.
- Press Shift + A to open menu to insert nodes.
Connecting nodes
Nodes are connected by dragging from the exit socket of one node to the entry socket of another node. Nodes can be disconnected by starting to create a new link from an exit socket and releasing the pointer in the workspace.
Deleting nodes
To delete one or many nodes:
- Right click on a selected node and choose Delete
- Select nodes and press Del on the keyboard
A single node is deleted immediately, but multiple nodes require a confirmation.
Selecting nodes
- Click on a node to select it. Click in the workspace to deselect.
- Add nodes to your selection: hold Ctrl or Shift and click on the node.
- Deselect a node from multiple selected: hold Shift and click on the node.
Box Select
You can select multiple nodes at the same time by holding Ctrl or Shift and start dragging with the mouse. This will create a box selection that will select enclosed nodes
The nodes can then be moved, copied or deleted.
Info
If Ctrl or Shift is held down when finishing the box selection the nodes will added/removed in the same way as holding the button and clicking on a node, see Selecting nodes
Editing multiple nodes
The sidebar displays a list of properties for each type of node. If you select multiple nodes of the same type, you can edit a property for all of them simultaneously by making the change once in the sidebar.
For instance, if you select two "say" nodes, the sidebar will display the "character" property. If the character is the same in both nodes, the field will show that one character. However, if the content differs between the two nodes, the field will indicate "(Mixed values)". You can then simply override the character in both nodes by selecting a new one in the character selection field. This functionality applies to all other types of inputs such as selecting from options, choosing a color, entering a number, etc.
Copy and paste
It is possible to copy and paste nodes. Select one more nodes in the workspace and press Ctrl + C to copy. The copied nodes can then be pasted into the workspace (or a workspace for a different project) by pressing Ctrl + V.
Characters and groups will also be copied and recreated if necessary.
Info
Copy and paste in Fabella is stored in the browser and does not interfere with the normal clip board.
Copy and paste to text
It is possible to copy nodes as text (in JSON-format). This makes it possible to share the nodes with other persons or store them locally on the computer or in other places.
- Select one or more nodes in the workspace.
- Right-click on one selected node and choose Copy to text.
- The text is now stored in the clipboard.
To paste the nodes from text: 1. right click in the workspace and select Paste from text 2. Paste the copied text into the text field and press OK

Organizing nodes
Groups
Use groups to organize the nodes in a project. Groups can then be opened and closed and reduces clutter in the workspace. For very big projects it also has the benefit of reducing the load on the computer and will make it smoother to navigate and edit nodes.
Create new group
- Select nodes
- Right click on a selected node and select Add to group -> Create group
Add node to group
- Select nodes
- Right click on a selected node and choose Add to group and then what group to add to.
Remove from group
- Right click on a selected node and choose Remove from group.
- Right click on the group and choose ungroup nodes to remove the group but keep the nodes
- Right click on the group and choose ungroup nodes to remove the group and delete the nodes
Snapping
If you want your project to look more structured you can press Alt to toggle snapping. This will make the all the nodes in the project to snap to a grid when they are moved and will make it easier to line up the nodes.
Keyboard shortcuts
Creating nodes
Many the nodes have single letter keyboard shortcuts that instantly creates the corresponding node.
| Node | Shortcut |
|---|---|
| Say | S |
| Hear | H |
| End | E |
| Display | D |
| Global | G |
| Roll dice | R |
| Modify state | M |
| Condition | C |
| Switch | W |
| Loop | L |
| Script | $ |
| Monetization | O |
Other keyboard shortcuts
| Function | Shortcut |
|---|---|
| Open add node menu | Shift + A |
| Go to next node | Right |
| Go to previous node | Left |
| Save Project | Ctrl + S |
| Copy | Ctrl + C |
| Paste | Ctrl + V |
| Duplicate | Ctrl + D |
| Search node | Ctrl + F |
| Delete | Del |